Wednesday, March 5, 2014

Finished product...and a living room tour

Well, I'm back to show you the finished product on the fireplace wall. I finally primed and painted as well as decorated it. And I love it! It makes the room feel lighter without that big ol' hole there.

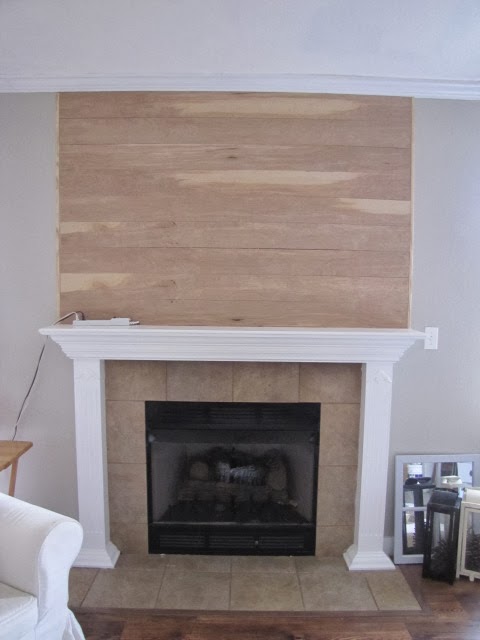
Here's a before pic:


And now here's the after:


I kept everything as easy as possible and even if it's imperfect I think it looks great. I finally feel like my living room is coming together. I even busted out all the décor items from the middle bedroom:


Slowly as I decorate my house that pile and disorganized mess looks cleaner.

Anyhow, back to the living room. It's come a long way from here, approx. 6 months ago:

I'm so glad the walls are painted, as well as the ceiling. The ceiling is a flat white Behr paint and primer. The walls are Revere Pewter by Ben Moore but color matched in Behr paint and primer eggshell.
I like how the white of the panels plays off the white of the curtains on either side. I still need to paint the backdoor if you can see. Haven't decided if I'm doing white or a color to give it a nice pop.
 
Here's a closer look of the actual mantle:
 
The lanterns used to look like this:

You can see I started to paint them a metallic gold. It was Rustoleum I believe and I think they turned out awesome. I draped a magnolia leaf swag across the mantle and added a couple of white candles in jars and it's done. Simple and elegant.
Sorry about the weird coloring on the pictures. It was late in the day and the lighting is bad. Plus, I'm no camera expert.
 
Anyhow. Here's the other side of the room:


 I went for simple on this side. I got new pillow cases from Hobby Lobby (love HL!!!)
The butterfly one was 3.00 and the yellow chevron was 4.00. (half off when I got them!) the turquoise one I already had.
I painted these lanterns gold as well (I think I'm just on this gold kick for some reason). They used to look like this:
I've had these since forever and I almost got rid of them. But then I decided to try and make them over. I took out the paper part of the lantern which, as you can see, is broken and bent. I spray painted them gold and I feel like they turned out pretty well.

The candelabra was also this heinous gold color (why did I take things that were gold and paint them other colors and take things that were other colors and paint them gold? IDK)

So I painted it a basic white:
So, that's it. I'm so happy with how my living room turned out. And that the stupid hole is gone:

Sunday, March 2, 2014

Happy Birthday Seester!!!!


Well, well, well, the first year I finally get to spend a birthday with my sister (since we've moved within driving distance!) and what happens? This:

Snow Showers? In MARCH?!!!

OMGItotallymissFlorida----whatwasIthinking??

So, this is no time to go out and paint the town red. Streets are crazy icy and therefore we were not inclined to be out in that.

Still, I wanted to wish her a Snowy  - I mean Happy- Birthday!

Maybe we can celebrate in like, June, or something when it's more likely to be nice weather...then we can paint the town red? (and be back home by 930pm cuz that's how I roll)

Well, that's how you roll too-considering you're what, 85 now?

Anyhow. Happy Birthday You! So, glad I am near you now!

(Oh, and, despite the fact that I'm closer, it in no way makes me more responsible -aka no present or card. So...yeah, sorry 'bout that, sis.)

Love,
The lil sis (see what I did thur?)

Hole-y Mole-y!

So, do you remember the hole above the fireplace which was supposed to house those old tube TVs with the big ass back (baby got back!)?

Now this is the story all about how my hole got flip turned upside down...

Okay, awful, I know. But it got covered, not flip turned upside down. But I'd still like to take a minute, just sit right there, I'll tell you all about how I did it with a bit of cheap flair...

All right, all right. I'll stop. It's bad, I know.

My hole was used over Christmas for my cute little Christmas village:


But otherwise, it was completely useless to us. So, I had the brilliant idea to cover it with paneling. Similar to this look, which I found on Pinterest:


 I used a tutorial here to help me with what material to use. In all, I only spent about 30.00 on this project which was awesome. Almost half of that was the amount for the boards that were cut (about 14.00). I simply took a picture and showed it to the Home Depot guy and he showed me the board, I told him the measurements I needed, and he cut them. Easy-peasy.

The not so easy part was figuring out a stud. See, I wanted to place a 2x4 stud in the middle of the hole for better support; and, in case I wanted to hang something on the finished paneling, there would be a stud right in the middle to nail/screw into.


So I took the measurement for the opening from the top of the hole to the top of the shelf and added a 2x4 (cut to size by HD again).
I simply screwed it in on the bottom:
And then used an L brace on the top back portion of the stud:


 But when I started to place the planks there was still a gap between the plank and the 2x4 because the shelving unit was slightly inset from the surrounding wall (you can sort of see what I mean in the above pic).  This caused the gap below:


Ugh. I've never professed to being a carpenter or "handy". Mostly I just wing it. I'm sure a true DIY would've figured this out ahead of time and done it in a neater fashion. All I do is rig stuff!

So I had to improvise and add another board (I used a fence post board I had laying around for the thin width). That way when I placed the planks against the wall it also was flush with the "stud" in the middle.

After that it was smooth sailing. I simply used finishing nails (already had) and nailed the planks in the wall. They were very thin and light so no screws were needed. Oh, and if you're wondering about the fact that I'm closing up the cable plug- there were already 2 more set up in the living room (yay). So I was only closing one that would never been used.

Here it is half way through:


And after nailing them all in:


I also added small trim to the sides for a more finished look to cover the rough edges:

All of this was accomplished by simple finishing nails since the plywood was so very light. I didn't liquid nails any of the boards even though I could have for a more secure fit, because I wanted to give the next owners the option to take it down without ruining the drywall (though Luhvah pointed out that it's unlikely they'd even know it was there, nor would they need it open since it's for the old tube tvs).

Now all that's left is priming and painting.

I'll be back later to show you the finished results!


Thursday, February 20, 2014

Open shelving

Open shelving in the kitchen is so popular.
Here's the evidence all over pinterest:


So I figured it'd be a great way to add more space to my teenie-tiny kitchen. Plus, I'd had open shelving on one of my cupboards at the Kingdom:


I'd really gotten used to the easy access to my plates/bowls on display so I liked the idea of having that at The Miracle as well. 

This time I had to build shelves which was easy as apple pie. I shamelessly stole the corbel look from Young House Love:

In the end I don't think I got the right lumber- I believe mine was 12" wide but only 1" thick (I believe theirs was 2" thick). Basically, my board was skinnier looking than theirs. I used "common board" from HD and for a 10ft length it was 20.00. I had it cut into 3 shelves of 40" each. Which worked perfectly on my wall. The corbels were 10.00 each so for 6 it was 60.00+ 20.00= 80.00 for custom shelves.

Then I got to painting everything white. 


Here's the finished product:


  It gives me much needed space and it's cute as well! I painted the ceiling (see how low it is! Argh!) Which helps with the dungeon but there's still plenty to do in this kitchen.
 
I need to paint the cabinets and I will also be trying my hand at painting the ugly laminate counters soon. My job is not over in my attempt to make this kitchen feel more spacious and less like a cave.
 
But for now I like the open shelving. It gives me more space and the common dishes used are easily accessible. Check off one more thing that makes this place feel more like home.


Sunday, February 16, 2014

Busy, Busy, Busy...

I haven't checked in for awhile and that's cuz I've been hell-a busy at The Miracle on 134th St.

Mostly painting the crap outta it. It's really popular to paint ceilings the same color as the walls here in OK, which I dislike. So, not only am I dealing with changing all the dreaded smoker's yellow trim, I've also had the added task of painting the ceilings back to flat white. It's worth it though because it opens the space up so much better! For example, the kitchen has a really low ceiling.  with the same color ceiling as the walls it makes an already low kitchen ceiling feel so.much.lower. I feel like I'm in a cave.


 (I have no idea why it's so low because they vaulted the ceiling in the living room and it doesn't make any sense why they wouldn't make the kitchen ceiling higher too). Painting ceilings was a must.

I've also been hanging shelves in the kitchen (more on that to come), organizing and unpacking (remember I'm not one of those who unpacks immediately, I wait to see how we live in the house first...so, despite the fact that we've lived at the Miracle for about 4 months now,  I still have some boxes to unpack),

and other odd projects here and there.

I've hardly hung anything or done much "decorating". In fact, most of my "decor stuff" is in my guest bedroom ready and waiting to be used or look pretty.

This wall is primarily filled with decorative items or furniture. What I don't use in decorating I will get rid of (garage sale when weather is nicer).

I'm waiting to finish up with all the friggin' painting (grrrr). Which, needless to say, I'm completely burned out on. What with painting all the trim and doors,  walls, and ceilings--it's never ending. And I haven't even started on bedrooms-- I'm just talking about the main parts of the house- living, kitchen, dining, entry, and halls. Tedious work + me burned out on painting = coming along slowly.

And since I haven't really decorated it's kinda silly to show you my house considering most of it's blank walls.

 I'm filling my time with cleaning out my boxes:

and organizing (okay, sort of organizing- at least you can see the bed now! You couldn't in the pic above):


But I will be posting more because I've been doing some projects I wouldn't mind showing you.
More to come!!!!

Wednesday, November 6, 2013

Settling In...The Miracle on 134 Ct

Well, like always, I’m more behind than ahead when it comes to blogging. Okay, scratch that. I’m more behind on more than blogging but that will be our little secret, ‘mmmkay? It’s been a whirlwind few months since we've moved and we finally found a house and started the process of settling in to school, work, home. 

There are many moments over the past few months that I've screamed out loud,in my head "What was I THINKING! AAAAHHHHHH!" but in the end I'm hoping it's all working out for the best. Slowly but surely I'm finding a way to make this place our new home. 

Since we finally did find a new house (and moved in) I wanted to take a moment to breathe to show you the new digs. I've taken to calling it The Miracle on 134 Ct. cuz it's a miracle that we even found a house that worked for both me and Luhvah. We both had very specific things we wanted in a house and it was difficult in a tiny little Oklahoma town to find all those things together (without building). 

It isn't my forever home by any means but I still like it and am just grateful to have our own place again (living with other people tries my patience greatly).

Let's start with the outside. It has great curb appeal already and is situated at the end of a cul-de-sac. 
This time around we wanted a single story home. Luhvah wanted something smaller and more manageable so we did some downsizing too.


I love the front porch area. It's so open and wide which gives me more room to decorate. 


I already started adding pretty things. I'm so glad to come back to colder weather where I get pretty mums:


Walking into the home we have an entry. Which again, is nice and big (these are from the inside looking into entry).


 I plan on putting in some hooks for hanging backpacks, etc.similar to this:


Going into the living room we have high ceilings and a fireplace! YAY! It's a gas fireplace, not wood, which is kinda a bummer but it's super convenient since all we have to do is flip a light switch and voila! Instant fire! I plan on getting a fire crackling CD and wood burning candles to hopefully recreate the similar ambiance of a wood burning fireplace. Oh, and have I mentioned that every inch of this house has smokers yellow baseboards/crowns/doors/ fireplace moldings? Ugh. Crack open the white paint can.


Oh and this opening above the fireplace?

It's going to be filled in (since we don't use it for tv or anything). I'm thinking of something like this:


From the living we walk into the breakfast nook. This is where part of the downgrade comes- we don't have a formal dining room. We hardly ever used ours before. It's a bummer for holidays to not have a big dining area, but in the end this little space works for us on a day to day basis since it's just the 3 of us.

 
I plan on having a bench built in the nook area for more storage of non-every day items. Like this:
 

Which brings us to the kitchen. Not big. I compare this kitchen to my old one and this is where I am most disappointed in the house. Certainly it's smaller (I equate this kitchen to the size of an apartment kitchen  -which is just wrong when talking about a house). To maximize my space I've had to get inventive with where to put things. Because there is literally only 4 full cabinets. Most average house kitchens have at least 8+ full size cabinets.  Every cabinet you see in these pics (besides the 4) are narrow cabinets, akin to those which are used to store tall, thin cookie sheets etc.


I plan to hang open shelves on the blank wall (more on that to come). And, as I said, I will build a bench in the breakfast nook to acquire extra storage space. To make it feel more spacious I'll be painting the cabinets white as well. Although I'm so glad to see that these cabinets aren't honey oak, I'm still gonna paint them because this kitchen has a low ceiling and feels like a cave. So I need something to make it feel bigger and brighter. And bigger. Oh wait. I already said that. 

Anyhow...Down the hallway it leads to 2 bedrooms and a bath. The bedrooms are much bigger than my previous house which Monkey really loves. My 3rd bedroom (aka guest room), has been doubling as a storage room for all the things that we don't need right this minute. It has condensed 3 rooms from my previous home into 1 (the loft, guest bedroom, and formal dining room). Although I did get rid of many of the large pieces of furniture in Florida there are still tons of things I've kept. I'll probably be having a garage sale for some of this stuff at some point.


Moving back over to the other side of the house we have the master, laundry room, and a small nook/hall between the two.


 I really like this nook because it's a place we can throw our keys and stuff when we come in from the garage (which is attached to laundry like most houses). The laundry room is also much bigger than our previous house. Which I like. In the nook I've already found an awesome little secretary desk that my mom was nice enough to give me (for FREE!) that fits perfectly in the area. Eventually I will be painting it (I'm thinking a pretty pop of muted seafoam or aqua).


Master Bedroom- a disaster but big. 
 

Master bath- another disaster, average size. I will say the Master bath is the second place I'm a little disappointed in. The layout is all wrong and I really hate having the closests in the bathroom. Some people like that but not me. They are his and her closests which are a pretty good size.


I realized when blogging this that I have no pictures of the backyard (what is it with me and not taking pics of a backyard?). But we have a nice porch with deck. The backyard is narrow but long so it's a nice size. Hopefully Monkey and I will be starting a small garden in the spring so we'll see how that goes. I plan on planting a couple of trees as well since I think it's in need of some privacy from the 4 separate homes that abutt us (the downside to living at the end of a cul-de-sac with a large backyard). And there are some other problematic things in the backyard. The back of the house needs a flower bed area to stop water from settling against the home which would also help with aesthetics as well. I also want another fire pit,  which we need to build. I'm hoping to make this into a bit of an oasis. I'll post pics soon of it but with winter coming on not much will be done with it until spring anyway.

And before I leave let me keep it real. Our rooms mostly look like this right now:


Okay, well it's not quite that bad (these were taken 3-4 days in) but even now, a month in, we still have a lot of clutter and boxes. I'm not one of those "get everything outta the boxes and find a place for it within 24 hours" kinda gals. I'm more of the "learn the way the house functions best for you by living in it and then put things where they seem to flow best" kinda gals. So there's still plenty of stuff in boxes or pushed outta the way but needs to find a place to be hung/set, etc.

So, that's it. The Miracle on 134 Ct.
 
By the way, looking back at all these pictures I realize I do an awful job of getting a complete pic. Some of these pics don't even show the full scope of a room in it's entirety.
But stay tuned because I'm going to try and blog more often from now on, now that things are settling down a bit with jobs, life, etc. and you'll be seeing more of it as I go.