Saturday, March 15, 2014

Make a good Entrance...

Today I wanted to show you my entry or foyer or for-yay if you're fancy.  I always believed you only had a for-yay (foyer speak for fancy people) if you were really, really wealthy. Well we're not so I guess I just have an entry to show you.

I was really excited to decorate this area because we only had a walk in area at the Kingdom, not a really truly true entry. See here:
                     
One of the things I loved about the Kingdom was how open it was but that meant there wasn't really an entry way specifically.

Not the case at the Miracle. Here it is on inspection day:
Really bad picture and it's from the living room looking into it rather than the actual front door but you get the idea.
It was a pretty big area to decorate. I waited to do anything with it until I painted everything (ugh). But thankfully, since this was the main part of the house, I stuck with Revere Pewter by BM and flat white ceilings.

After painting I hung curtains. I just put up something I already had which I'd used in the master bedroom at the kingdom. But I liked them in the foyer so they stayed.


Next, I had the difficulty of finding a rug. I went to Target and brought home multiple choices to contend with:

After looking at them all I figured I could return what didn't work. Oh, and if you'll notice- the door is still smoker's yellow (or cream if you're nice). I plan to change that but I'm trying to decide if I want white, black, or maybe again- a pop of color. IDK. Still deciding.

Anyhow, on to the rugs.

I kept this small rug for the walk way between the entry and the living room (to hide a cord and the scuffed up tread):

I really wish they would've had a larger version of this rug (it was a small mat if you can't tell). It was exactly what I was looking for in an entry rug. Neutral but still some color and pattern. It was gray, cream, and mustard yellow (if you can't see from the pic). But alas, they didn't have a larger size or my search would've been over.

So, I tried out the variety of other options.

1) I picked out this mustard yellow because I thought it was beautiful and different. Giving some color. But when I got it in the entry it clashed with the curtains too much. So, nope.
 

 2) Then I went with this gray greek key pattern (I don't know exactly what this pattern is called). I liked it but it seems too light to hold down the floor, if that makes sense.

 
3) Next was this floral number. It had color, but still seemed neutral. But idk, it was still too busy looking for the curtains and entry in general.

 
4) Then, I tried this green striped number. Which I really liked. It had color and yet was subtle enough not to clash too much with the floral curtains. But still, though you can't tell in this pic, the green was too vivid. Not as muted as I'd prefer. Plus, it screamed SPRING! which was great for the upcoming months but then I'd have to buy another rug for fall/winter. Most people might just buy an additional rug. But if you know me, I'm el-cheapo. So, I needed my rug to do double duty. All year round, baby.

 
5) Finally, I tried this trellis patterned gray rug. Ahhhhh....Goldilocks. I liked how this was a darker gray so it felt more weighted. It had a tinge of blue in the gray (whereas the other gray rug was a full gray-gray). So, this one looked like it fit better and didn't clash with my curtains.  Yet it certainly stood out more on the floor. This was it. The One
 

And it looked very good with the other (my favorite) rug:


Here's the inside corner of the entry too:
That lil statue guy there is an ashtray. It was my grandmother's so it has sentimental value. He's been around for as long as I can remember at my grandma's and we named him Jeeves when we were younger cuz he looked like a fancy butler. Luhvah thinks he's hideous but I love him so he stays.


And I'd be remiss if I didn't show the leash hanger for the dog leash-
 
I made this awhile back. 3.00 Ikea dog butt hook and 2.00 wood plaque from Hobby Lobby. Plus scrapbook materials. It was an easy make and looks so adorable hanging in the entry. 

Besides the entry rug (30.00 for the gray and 20.00 for the small yellow) I shopped entirely from the guest bedroom for any décor items. So, other than paint- which was overall for the house, the total renovation for this entry was 50.00.


Oh, and the cat was free too. :)

Wednesday, March 5, 2014

Finished product...and a living room tour

Well, I'm back to show you the finished product on the fireplace wall. I finally primed and painted as well as decorated it. And I love it! It makes the room feel lighter without that big ol' hole there.

Here's a before pic:


And now here's the after:


I kept everything as easy as possible and even if it's imperfect I think it looks great. I finally feel like my living room is coming together. I even busted out all the décor items from the middle bedroom:


Slowly as I decorate my house that pile and disorganized mess looks cleaner.

Anyhow, back to the living room. It's come a long way from here, approx. 6 months ago:

I'm so glad the walls are painted, as well as the ceiling. The ceiling is a flat white Behr paint and primer. The walls are Revere Pewter by Ben Moore but color matched in Behr paint and primer eggshell.
I like how the white of the panels plays off the white of the curtains on either side. I still need to paint the backdoor if you can see. Haven't decided if I'm doing white or a color to give it a nice pop.
 
Here's a closer look of the actual mantle:
 
The lanterns used to look like this:

You can see I started to paint them a metallic gold. It was Rustoleum I believe and I think they turned out awesome. I draped a magnolia leaf swag across the mantle and added a couple of white candles in jars and it's done. Simple and elegant.
Sorry about the weird coloring on the pictures. It was late in the day and the lighting is bad. Plus, I'm no camera expert.
 
Anyhow. Here's the other side of the room:


 I went for simple on this side. I got new pillow cases from Hobby Lobby (love HL!!!)
The butterfly one was 3.00 and the yellow chevron was 4.00. (half off when I got them!) the turquoise one I already had.
I painted these lanterns gold as well (I think I'm just on this gold kick for some reason). They used to look like this:
I've had these since forever and I almost got rid of them. But then I decided to try and make them over. I took out the paper part of the lantern which, as you can see, is broken and bent. I spray painted them gold and I feel like they turned out pretty well.

The candelabra was also this heinous gold color (why did I take things that were gold and paint them other colors and take things that were other colors and paint them gold? IDK)

So I painted it a basic white:
So, that's it. I'm so happy with how my living room turned out. And that the stupid hole is gone:

Sunday, March 2, 2014

Happy Birthday Seester!!!!


Well, well, well, the first year I finally get to spend a birthday with my sister (since we've moved within driving distance!) and what happens? This:

Snow Showers? In MARCH?!!!

OMGItotallymissFlorida----whatwasIthinking??

So, this is no time to go out and paint the town red. Streets are crazy icy and therefore we were not inclined to be out in that.

Still, I wanted to wish her a Snowy  - I mean Happy- Birthday!

Maybe we can celebrate in like, June, or something when it's more likely to be nice weather...then we can paint the town red? (and be back home by 930pm cuz that's how I roll)

Well, that's how you roll too-considering you're what, 85 now?

Anyhow. Happy Birthday You! So, glad I am near you now!

(Oh, and, despite the fact that I'm closer, it in no way makes me more responsible -aka no present or card. So...yeah, sorry 'bout that, sis.)

Love,
The lil sis (see what I did thur?)

Hole-y Mole-y!

So, do you remember the hole above the fireplace which was supposed to house those old tube TVs with the big ass back (baby got back!)?

Now this is the story all about how my hole got flip turned upside down...

Okay, awful, I know. But it got covered, not flip turned upside down. But I'd still like to take a minute, just sit right there, I'll tell you all about how I did it with a bit of cheap flair...

All right, all right. I'll stop. It's bad, I know.

My hole was used over Christmas for my cute little Christmas village:


But otherwise, it was completely useless to us. So, I had the brilliant idea to cover it with paneling. Similar to this look, which I found on Pinterest:


 I used a tutorial here to help me with what material to use. In all, I only spent about 30.00 on this project which was awesome. Almost half of that was the amount for the boards that were cut (about 14.00). I simply took a picture and showed it to the Home Depot guy and he showed me the board, I told him the measurements I needed, and he cut them. Easy-peasy.

The not so easy part was figuring out a stud. See, I wanted to place a 2x4 stud in the middle of the hole for better support; and, in case I wanted to hang something on the finished paneling, there would be a stud right in the middle to nail/screw into.


So I took the measurement for the opening from the top of the hole to the top of the shelf and added a 2x4 (cut to size by HD again).
I simply screwed it in on the bottom:
And then used an L brace on the top back portion of the stud:


 But when I started to place the planks there was still a gap between the plank and the 2x4 because the shelving unit was slightly inset from the surrounding wall (you can sort of see what I mean in the above pic).  This caused the gap below:


Ugh. I've never professed to being a carpenter or "handy". Mostly I just wing it. I'm sure a true DIY would've figured this out ahead of time and done it in a neater fashion. All I do is rig stuff!

So I had to improvise and add another board (I used a fence post board I had laying around for the thin width). That way when I placed the planks against the wall it also was flush with the "stud" in the middle.

After that it was smooth sailing. I simply used finishing nails (already had) and nailed the planks in the wall. They were very thin and light so no screws were needed. Oh, and if you're wondering about the fact that I'm closing up the cable plug- there were already 2 more set up in the living room (yay). So I was only closing one that would never been used.

Here it is half way through:


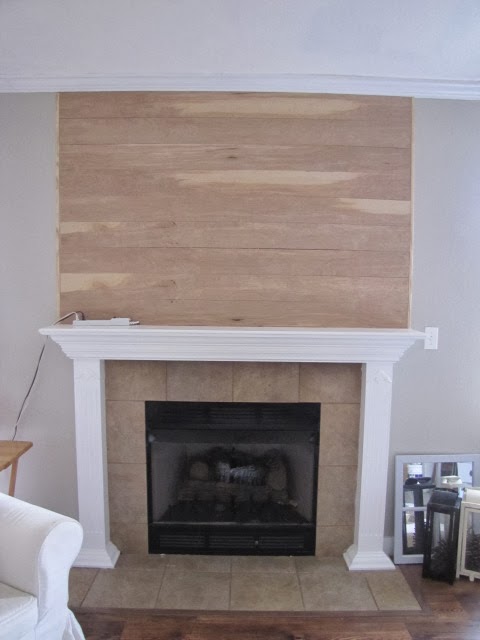
And after nailing them all in:


I also added small trim to the sides for a more finished look to cover the rough edges:

All of this was accomplished by simple finishing nails since the plywood was so very light. I didn't liquid nails any of the boards even though I could have for a more secure fit, because I wanted to give the next owners the option to take it down without ruining the drywall (though Luhvah pointed out that it's unlikely they'd even know it was there, nor would they need it open since it's for the old tube tvs).

Now all that's left is priming and painting.

I'll be back later to show you the finished results!